
Winner, winner, chicken dinner! Yup, we made it to the end and hopefully put a dent in all those scraps that seem to accumulate overnight. That is the object……to use up some of those scraps but more importantly to have some fun doing it. I hope you had fun with it. Probably not so much after you do this clue….LOL! No, I’m only joking! Last month was easy peasy, this month not so much. I made last month easier because it was a short month but also because is was a hard place to give you more to do. You would have had TOO much information and probably been able to put the whole thing together! Can’t Have That!!! I had to drag it out! Sorry! But here you are and the end is near!
One of the problems with making any mystery quilt is that you never know what it’s going to look like until you’ve put it all together. Of course, that is part of the fun of it but looking back there are usually things you would change if you actually knew what was coming together. I’m like you in that I never know what my own mysteries are going to look like. I conjure them up on my EQ (Electric Quilt software) and randomly put colors together to get some semblance of what I think it should look like. I always draw from my stash to make the quilt so it depends on what I have available at the time. I always have a wide range of cut scraps but sometimes my border selections are limited. Looking back, I would have changed my border colors to give more focus to this quilt. That inner border of mine is kind of blah and doesn’t give much direction. But it is what it is and if I ever decide to make this one again I will surely change it up. But I had fun! Used up a lot of scraps! And strips!! I hope you did too!
OK, let’s get down to business!
Stars and Strips Forever – Clue #4
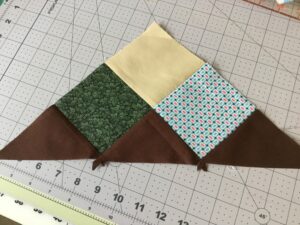
- Cut the 4 1/4″ outside background squares on one diagonal. Using one 4″ inner background and 2 – 4″ assorted squares assemble with the outside background HST (half square triangles) as shown below. Press and trim off dog ears. Make 14. ( Just a note: the 9 patches that were made last month needed to be trimmed to 10 1/2″ square. These may need to be trimmed a bit too. See how they fit first.).
Assemble the completed quilt squares as shown using the remaining assorted 2 1/2″ x 10 1/2″ strips as sashing and the 2 1/2″ outside background squares as cornerstones. Use the 2 7/8″ outside background squares cut on one diagonal to complete the outside cornerstone strip. Cut the 8″ outside background squares on one diagonal and use one HST on each corner. Cut the remaining outside background fabric in 3″ strips and sew to the complete the border.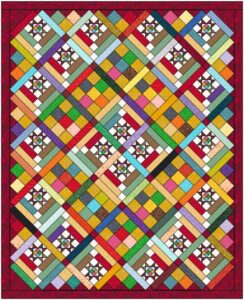
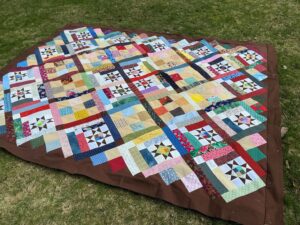
I was wondering how I was going to take a picture of my version of Stars and Strips. We have had so many rainy, snowy and windy days lately and I really don’t have any place in my house large enough to show the whole quilt laid out. Finally yesterday the sun came to my rescue and dried up the wet spots in my lawn. So here it is. I hope you will take pictures and post on Facebook so I can see how you did. I love to see them!
PLEASE DO NOT SHARE THIS INFORMATION ON FACEBOOK.
I ask that you send people here to the website for information.
If you have not joined in the fun on Facebook, check me out at MakingScrappyQuiltsWithCharlotte.
I love seeing all your hard work and getting to chat with you a bit.
Please feel free to direct others to this website for the information and clues.
THANK YOU FOR YOUR COOPERATION!
© 2026 Charlotte Hawkes. All rights reserved.